
Are you compiling a video from your last adventure? Or maybe you need a presentation for your job or studies where you would like to leave voice comments? A slideshow with a voice recording is a great way to present the images in a structured way and accompany them with verbal comments. Although it might sound like a difficult task that requires a lot of technical knowledge, in reality, it is very easy to create slideshow with voiceover.
All you need is a laptop, a working microphone, the one installed on your laptop will suffice, a set of images, and suitable software. You may choose from iMovie for your Mac, SmartSHOW 3D for Windows or just go with PowerPoint. The goal here is to choose a program that is simple to learn and does not expect you to be a professional movie maker. On the other hand, a slideshow maker with voiceover has to provide a good set of tools and design options. Let’s look at the three options in more detail.
Make a Slideshow
First of all, you need to prepare a future voiceover slideshow by selecting images. A reasonable duration would be about four to five minutes – a length of an average song. It means that you need to choose around 40 images for your little movie. Put them in the right order in the storyline at the bottom of your screen. Add some fun transition and animation effects by browsing through the built-in library of your slideshow maker. Include a tune that fits the purpose of your little movie and makes it complete. Now it is time to make a video with pictures and voiceover!
1. Use iMovie for Mac
iMovie is a program designed for Mac owners to fit the requirements of their laptops. First, click Window and select Record Voiceover or press the letter V on your keyboard. The program will suggest checking your microphone, so make sure the sound is clear and loud enough. Rehearse your speech, go to a quiet room, and concentrate. When you are ready, click the Record Button that will trigger a 3-second countdown. Later, click the Record Button again to stop the recording. Listen to it to make sure you sound confident and your speech is clear. Finally, you can trim parts of the audio or reposition the voiceover.
2. Try SmartSHOW 3D for Windows
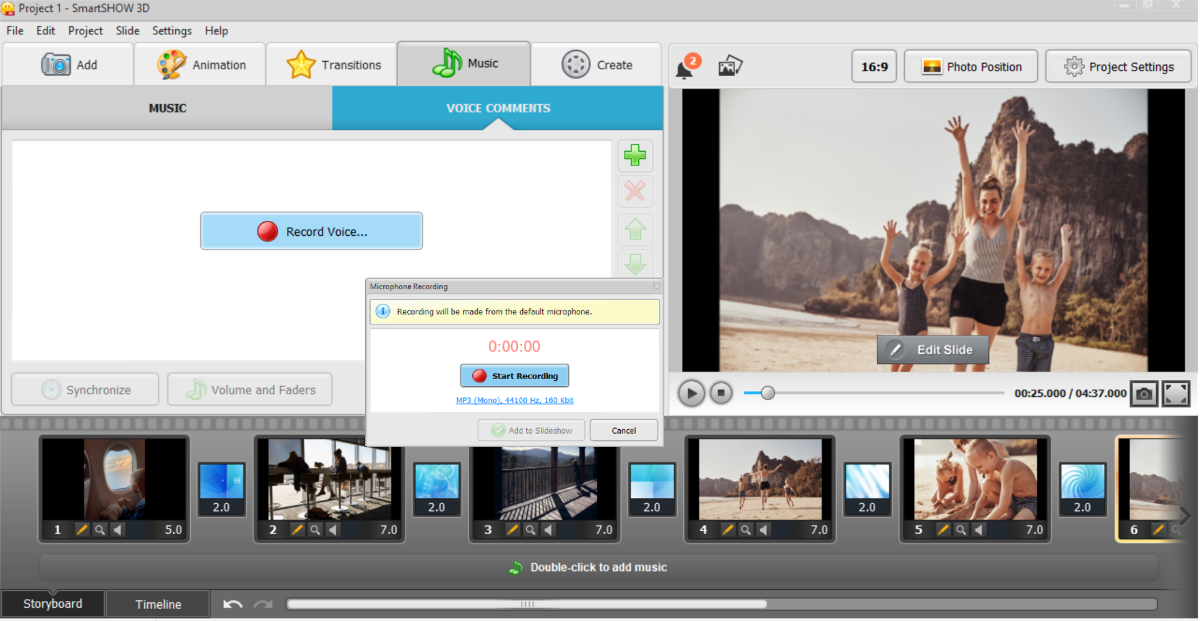
If you are an owner of a Windows laptop or PC, SmartSHOW 3D might be a good fit. The tool offers a ton of features and designing options to make your slideshow stand out. After you added a tune, do not leave the music submenu and go to Voice Comments. Click Record Voice and the recording will begin. Later, you can reposition and cut your video as well as change the volume. If you want to add a recording to only one slide, then go to the slide editor and select Record Voice right in the window. But make sure you do not exceed the duration of the slide.
3. PowerPoint for any PC
If you are creating a presentation for work and do not want to get into new tools, you can also make a slideshow with voiceover using PowerPoint. Click Record Slide Show and start recording. You can either record from the current slide or from the beginning of the slideshow. Unfortunately, this tool does not allow you to trim or cut your audio file, so make sure to get it perfect.
Save and Share
Watch your video with pictures and narration one more time and save it in any popular format. You can share your work online on your social media pages as well as send it to your friends and family members via email. Finally, you can transfer the file to the UBS stick and bring it to the university or office to share with your fellow students or colleagues.
A slideshow with a voice recording is a great way to translate your memories and impressions about your latest trip and share them with your followers and friends. It is also a step-up from old-fashioned PowerPoint with limited options whereby SmartSHOW 3D helps you to make professional presentations that will impress your clients. Get more helpful tips on how to make a slideshow with voiceover

0 Comments